
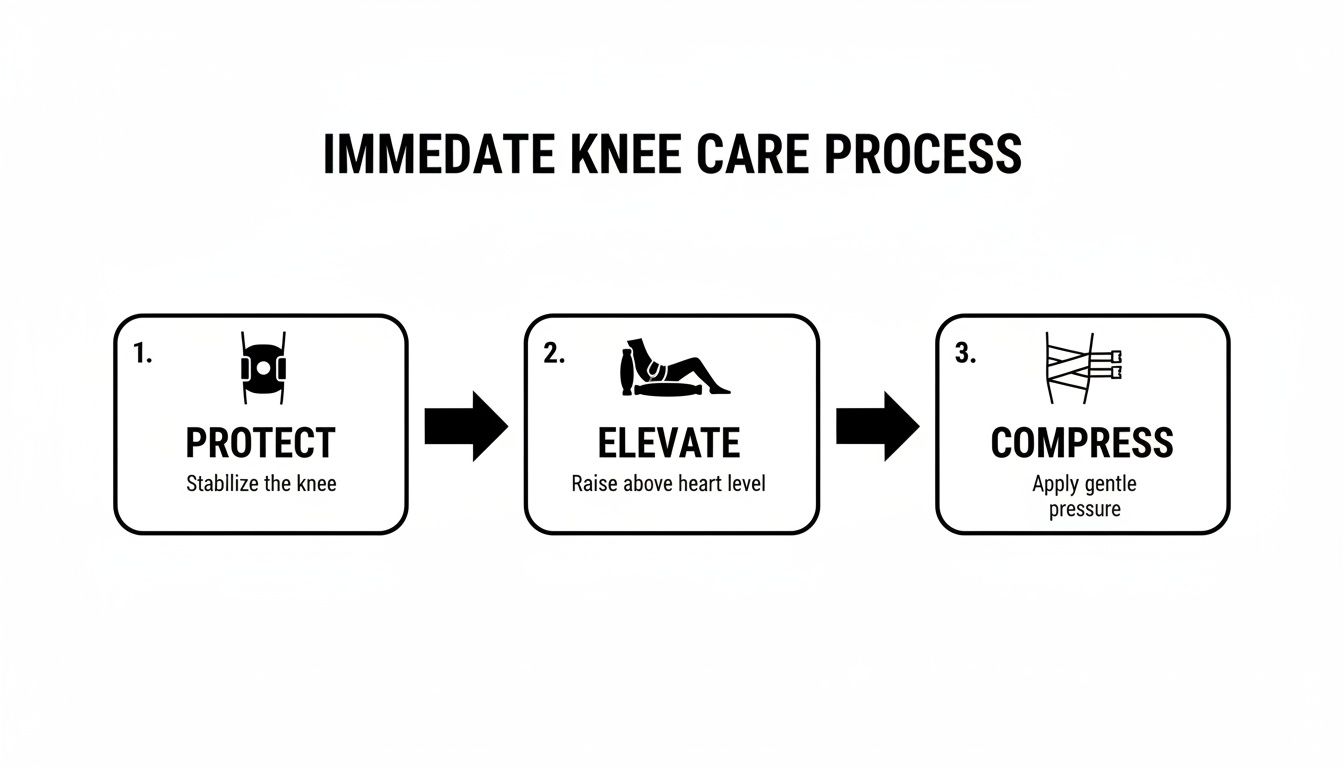
When knee pain suddenly flares up, what you do in those first few moments can make a huge difference in your recovery. The best immediate knee pain treatment at home isn't about toughing it out; it's about protecting the joint, getting it elevated, and using some compression to keep swelling in check. This smart first response paves the way for a much smoother healing process.
Immediate Steps for At-Home Knee Pain Relief
When you feel that first sharp pain or a sudden, deep ache in your knee, your instinct might be to just put your feet up and wait for it to pass. While a little rest is part of the equation, the thinking in physiotherapy has moved well beyond the old RICE (Rest, Ice, Compression, Elevation) method.
Today, we have a more complete and modern approach called the PEACE & LOVE protocol. It's designed to guide you through those critical first 24-48 hours and set you up for a better recovery down the road.
Understanding the PEACE Protocol
Think of "PEACE" as your immediate game plan for an acute injury. The whole point is to create the perfect environment for your body's natural healing powers to get to work without any interference.
-
P - Protection: First things first, stop whatever you were doing that caused the pain. If your knee started screaming at you during a run, don't try to be a hero and push through the last kilometre. You’ll likely need to modify your activities for a day or two—maybe swap a high-impact session for a gentle swim—to keep from making things worse. A simple knee brace can also offer some stability and act as a gentle reminder to take it easy.
-
E - Elevation: This one is simple but effective. Whenever you’re sitting or lying down, prop your leg up on a stack of pillows so your knee is comfortably above the level of your heart. Gravity is your friend here, helping to drain away excess fluid and cut down on swelling, which is often a big part of the discomfort.
-
A - Avoid Anti-inflammatories: Now, this is a major shift from the old advice. While it seems counterintuitive, inflammation is actually a natural and essential part of the healing cascade. For the first 48-72 hours, it's best to steer clear of over-the-counter anti-inflammatory meds like ibuprofen, as they can sometimes slow down your body's vital repair work.
-
C - Compression: Gently wrap your knee with an elastic bandage. The idea here is to apply light, consistent pressure to help limit excessive swelling, not to tourniquet your leg. If you notice your toes getting tingly or feeling numb, you’ve definitely wrapped it too tightly.
-
E - Education: This is all about becoming an expert on your own body. Take some time to understand what your knee is telling you—what it can handle and what it can't. This knowledge empowers you to avoid re-injury and make smart, informed choices as you recover.
Following the PEACE protocol means you're not just passively hoping the pain goes away. You're actively creating the ideal healing conditions right from the get-go.
Beyond these first steps, gentle heat can also be incredibly soothing once the initial, acute phase has passed. Looking into how a sauna for pain relief might help ease tense muscles around the knee is another great strategy for your at-home care toolkit.
Comparing RICE vs PEACE & LOVE Protocols
The way we think about treating acute injuries has evolved. Let’s break down the classic RICE method and compare it to the more modern PEACE & LOVE protocol.
| Component | RICE (Rest, Ice, Compression, Elevation) | PEACE & LOVE (Protection, Elevation, Avoid Anti-inflammatories, Compression, Education & Load, Optimism, Vascularisation, Exercise) |
|---|---|---|
| Initial Care | Focuses on rest and immediate symptom control (swelling, pain) using ice. | Prioritizes protecting the joint and avoids anti-inflammatories to allow natural healing. |
| Healing Process | Can sometimes lead to prolonged rest, which may weaken muscles. | Encourages early, appropriate loading and movement to promote tissue repair and strength. |
| Psychological Aspect | Does not explicitly address the mental component of recovery. | Includes Optimism and Education, recognizing the powerful link between mind and body in healing. |
| Long-Term Focus | Primarily aimed at the first 24-48 hours. | Provides a comprehensive framework from the moment of injury through to active recovery (LOVE phase). |
While RICE was the standard for decades, PEACE & LOVE offers a more holistic and evidence-based approach that supports the body's natural healing abilities for a stronger, more complete recovery.
Building Support with Strengthening and Mobility Exercises
While those immediate care steps are fantastic for handling a flare-up, lasting relief from knee pain isn't just about what you do in the first 48 hours. The real, long-term solution is built, not rested.
Think of the muscles surrounding your knee—your quads, hamstrings, and glutes—as a living, dynamic knee brace. When they're strong and working in harmony, they act as shock absorbers, taking the pressure off the joint itself. Building up this natural support system is your best defence against chronic pain and future injuries. It's how you turn a point of weakness into a source of real stability.
The initial steps of protecting, elevating, and compressing the joint are all about creating a calm, stable environment so you can start this crucial strengthening work.
Foundational Movements for Knee Stability
Starting to exercise a sore knee can feel a bit daunting, I get it. The trick is to begin with incredibly simple, low-impact movements. We're not aiming for intensity here; we're aiming for control and waking up the right muscles without aggravating the joint.
- Quad Sets: This is your starting block. Sit on the floor with your sore leg straight out. Pop a small rolled-up towel under that knee. Now, gently tighten your thigh muscle (your quadriceps) and think about pushing the back of your knee down into the towel. Hold that squeeze for about 5 seconds, then completely relax.
- Straight Leg Raises: Lie on your back, bend your good leg, and keep your sore leg straight on the floor. Tighten the thigh muscle of the straight leg, and slowly lift it about 15 centimetres off the ground. Keep it poker-straight. Hold for just a moment, and then lower it back down with the same slow control.
- Hamstring Curls: Stand up and hold onto a chair or wall for a bit of balance. Slowly bend your sore knee, bringing your heel up towards your glute as if you're trying to kick your own bum. Focus on feeling the hamstring muscle do the work. Hold briefly, then lower your foot back to the floor.
Consistency is everything with these. Don't worry about pushing for a high number of reps. Just aim for 10-15 reps of each exercise, maybe once or twice a day. The entire focus should be on smooth, controlled, and—most importantly—pain-free movement.
For a more detailed guide on getting back into a fuller routine, understanding how to start working out after a knee injury offers a really practical roadmap for progressing safely.
The golden rule for any rehab exercise is simple: listen to your body. If you feel a sharp, stabbing, or worsening pain, that's your cue to stop immediately. A bit of muscle fatigue or a dull ache is usually okay, but sharp pain is a definite red light.
Progressing Safely and Consistently
Once you can comfortably perform those basic exercises without any pain, it's time to start building more robust strength. To create that truly supportive "muscle brace" for your knee, you need to incorporate more comprehensive exercises.
For instance, looking into these 8 essential strength training exercises can be a game-changer for your knee stability. Even though they're framed for runners, the core principles of building strong glutes and legs are universal for anyone wanting healthier knees.
Just remember that progress is rarely a straight line. Some days your knee will feel amazing, and on others, it might be a bit stiff or grumpy. That’s normal. The key is to stick with a consistent routine, but be willing to adjust the intensity based on how you feel on any given day. This patient, methodical approach is what builds real, lasting strength and gets you back to moving confidently and without pain.
Using Topical Pain Relief for Targeted Comfort
Let's be real: managing pain is a huge part of staying consistent with your recovery exercises. While building strength and mobility is the long-term goal, sometimes you just need relief now. That's where topical analgesics come in as a practical way to manage pain right at the source.
They offer a smart, localized knee pain treatment at home, completely skipping the systemic effects you get from oral medications.
When you apply a pain relief cream, stick, or roll-on, you're putting the active ingredients exactly where it hurts. This targeted approach is a major advantage over a pill that has to travel through your entire digestive system first.
How Topical Analgesics Work
So, what's the magic behind them? These products typically use a clever combination of ingredients that create sensations of coolness or warmth on your skin. This process, called counter-irritation, basically gives your brain something else to focus on besides the underlying pain signals.
You'll often find a couple of key players in these formulas:
- Menthol: Derived from mint, menthol creates that classic cooling feeling that can temporarily numb the area and dull the nerve endings. It feels fantastic on a hot, angry-feeling joint after you've been active.
- Methyl Salicylate: This one does the opposite—it provides a gentle warming effect that helps boost blood flow to the area. That warmth is perfect for soothing stiff, achy muscles around the knee, especially before a walk or some gentle stretches.
Using these products strategically can genuinely change your day-to-day comfort and your ability to stick with a rehab plan. If you want to dig deeper into why they're so effective, you can learn more about the benefits of a topical pain reliever versus an oral one.
Think of topical relief as a tactical tool in your recovery toolkit. It's not a cure, but it's an incredibly effective way to manage symptoms. That symptom management is what allows you to keep moving and building strength—the real keys to getting better for good.
Integrating Topical Relief into Your Daily Routine
The real power of these products is unlocked when you use them at the right moments. Instead of just grabbing one when the pain is already bad, think about how it can support what you're trying to do.
For instance, if your knee feels stiff and creaky first thing in the morning, try applying a warming stick 15-20 minutes before your walk. It can help loosen everything up and make those first few steps much more comfortable.
On the flip side, after a session of strengthening exercises, a cooling roll-on can help calm down any post-activity soreness. This can help you recover a bit faster and feel ready for your next session without dreading the aftermath.
It's all about using that immediate comfort to support your long-term goals, keeping pesky pain from derailing your progress.
Adapting Daily Habits to Protect Your Knees
Treating knee pain at home is about more than just a few exercises and some ice. To find real, lasting relief, you have to look at the small, repetitive movements you make every single day. Things like how you get out of a chair, climb stairs, or even just sit at your desk can either help or hurt your recovering knees.

Making small tweaks to these daily habits can be a game-changer. It helps prevent re-injury and takes a lot of the chronic strain off your joints. Think of these adjustments as tiny doses of physiotherapy that you give yourself all day long.
Make Your Environment Knee-Friendly
Let's be honest, the world wasn't exactly built with sore knees in mind. But you can make simple changes to your own space to make life easier. The big goal here is to reduce how often you have to do deep squats and lunges just to get through the day.
For example, that low, comfy sofa you love? It might be a major source of knee stress every time you get up. If a new couch isn't in the budget, try adding a firm cushion to raise the seat height. This makes it so much easier to stand up without putting all that pressure on your knees. The same idea applies to your car seat and your office chair.
Your daily routine is filled with opportunities to protect your knees. Every time you avoid a deep, unsupported bend, you are actively contributing to your recovery and preventing future flare-ups.
Here are a few small but powerful changes you can start today:
- Stair Strategy: When going up, lead with your stronger leg. When coming down, lead with the weaker, more painful one. This simple "up with the good, down with the bad" mantra minimizes strain.
- Getting In and Out of the Car: Don't put one leg in at a time. Instead, turn and sit down on the seat first, then swing both legs in together. Do the reverse to get out.
- Mindful Lifting: Even if you're just picking up something light, always bend at your hips and knees while keeping your back straight. Avoid locking your knees and bending over from your waist.
Break Up a Sedentary Lifestyle
Sitting for too long is another hidden enemy of knee health. When you're stuck in a chair for hours, the muscles that support your knees can get lazy and stiff. Meanwhile, the joint itself stays stuck in a bent, compressed position.
The fix is surprisingly simple: move more often. Try setting a timer to get up and walk around for a few minutes every 30-45 minutes. This little habit gets your blood flowing, keeps the joint fluid moving, and helps stop that stiffness that makes the first step after sitting so painful. Every movement adds up to a healthier, more resilient knee.
How Education and Exercise Programs Transform Outcomes
When you're dealing with chronic knee pain from something like osteoarthritis, taking an active role is the single most powerful thing you can do. But just doing a few random leg lifts isn't going to cut it. The real magic happens when you combine targeted, thoughtful movement with a solid understanding of what’s actually going on inside your knee.
This is a huge shift in thinking. Instead of being a passive patient, you become an active participant in your own recovery. When you understand why you’re doing a certain stretch and how it helps your joint, you’re far more likely to stick with it and see real results. It’s all about empowering yourself with knowledge.
That’s where structured, evidence-based programs come in. They give you a clear roadmap to follow, helping you manage your symptoms, reduce how much you rely on pain medication, and ultimately get back in the driver’s seat of your life.
The Power of Guided Programs
Think of these programs as your personal masterclass in knee health. They don't just hand you a list of exercises. They teach you the mechanics of your knee, what's triggering the pain, and how to tweak your daily activities to sidestep those painful flare-ups. This educational piece is what's so often missing from generic advice you find online.
And the results speak for themselves. Programs like GLA:D® Canada are a perfect example of how effective this approach can be for managing pain at home. Since it launched in 2016, it has helped thousands of Canadians.
By the end of 2022, data from 11,228 knee participants showed a significant drop in pain after completing the program. Before they started, two-thirds of them were using pain medication, and a full one-third were even thinking about surgery. That shows you just how life-changing the right combination of exercise and education can be. You can dig into the program's significant findings to see the full impact.
The real goal here is to build self-efficacy—your own belief in your ability to manage your knee pain. That confidence is the secret sauce for long-term success and a better quality of life.
What Makes These Programs Work So Well?
The success of these structured programs comes down to a few core principles that you can start applying to your own routine at home. They’re built for lasting change, not just a quick fix, helping you build resilience in both your joints and your mindset.
- Neuromuscular Training: This is more than just basic strengthening. These exercises focus on rewiring the connection between your brain and your muscles to fine-tune your movement patterns, improve control, and give you better joint stability.
- Initial Supervised Sessions: While the end goal is to manage things yourself at home, getting some initial guidance is key. It ensures you’re doing the movements with proper form, which prevents further injury and makes sure you're getting the maximum benefit before you continue on your own.
- Data-Driven Progress: These programs are constantly tracking outcomes. Seeing the hard numbers—clear improvements in pain levels and physical function—is incredibly motivating and proves that the methods are working.
When you embrace this philosophy, you stop just chasing symptoms. You start building a solid foundation of strength, knowledge, and confidence that can help you put off, or maybe even avoid, more invasive options like surgery. It’s all about getting you back to living more actively and with less pain.
Knowing When Home Treatment Isn’t Enough
While a solid at-home treatment plan can work wonders for knee pain, it’s definitely not a cure-all. Being honest with yourself about your limits and knowing the signs that point to needing professional help is just as important for your long-term joint health.
Pushing through certain red flags can easily turn a manageable issue into a much more serious one. Think of it as your body sending out an SOS—when the signals are loud and clear, it’s time to listen.
Red Flags That Require a Professional
If you notice any of the following symptoms, it's a good idea to put your home care plan on pause and book an appointment with a doctor or physiotherapist. These are not the kinds of things you should try to "walk off."
- Significant Swelling: Your knee looks obviously puffy, round, or even misshapen when you compare it to the other one.
- Inability to Bear Weight: You simply can’t put your full weight on the leg without serious pain, or you feel like the knee is going to give out.
- Instability: The knee feels like it’s locking up, catching, or buckling underneath you when you’re just trying to move normally.
- Audible 'Pop': You either heard or felt a distinct popping sound at the exact moment the injury happened.
- No Improvement: You’ve been really consistent with your home care for a week or two, but the pain is stubbornly staying the same—or even getting worse.
These kinds of symptoms can point to a more serious injury, like a torn ligament or cartilage damage, that just won't get better with self-care alone.
Seeing a professional for a diagnosis isn't a sign of failure. It’s actually a smart, proactive step toward getting the right kind of treatment. A proper diagnosis is the bedrock of any effective recovery plan.
Knee osteoarthritis, for example, is a major issue here in Canada. While research shows that education and exercise programs can help many people avoid surgery, getting a proper diagnosis from the start is absolutely key. In fact, many people in these programs are able to successfully cut down on their use of analgesics after completing them. You can read more about these effective non-surgical outcomes.
If your pain is persistent, you might also find some helpful information in our guide on the best painkiller options for knee pain.
Your Top Questions on At-Home Knee Care, Answered
When you're dealing with knee pain on your own, it's natural to have a few questions pop up. Getting the right answers can make all the difference in your recovery, helping you feel confident that you're on the right track.
Let's clear up some of the most common uncertainties.
Heat vs. Ice: Which One and When?
This is probably the number one question we get. Think of it this way: ice is for injuries, heat is for stiffness.
If you’ve just tweaked your knee and it’s starting to swell, grab an ice pack. Apply it for 15-20 minutes every couple of hours for the first 48 hours. This is your go-to for calming down fresh inflammation.
On the other hand, if you're dealing with chronic, nagging stiffness without any swelling, a warm compress can be a game-changer. Use it for about 15 minutes before you get moving to help ease the joint and loosen things up. Always, always put a towel between the pack and your skin to avoid any burns.
Should I Push Through Mild Knee Pain During Exercise?
This is a tricky one, and it's all about listening to your body. A bit of muscle burn or a dull, low-level ache while you’re strengthening the muscles around the knee is usually okay. That's often just a sign the muscles are working.
However, sharp, shooting, or steadily increasing pain is a hard stop. That’s your body’s warning signal. The goal is to build strength, not cause more damage. If a particular exercise always brings on that "bad" pain, it's time to modify it or swap it out for something that feels better.
Don't underestimate the power of your diet, either. Keeping a healthy weight is genuinely one of the most impactful things you can do. Every pound of body weight puts extra stress on your knees, so even small changes here can lead to big relief.
Focusing on an anti-inflammatory diet can also give you an edge. Think lots of colourful fruits and vegetables, and foods rich in omega-3s like salmon and walnuts. It all helps manage the underlying inflammation that can contribute to pain.
For direct, powerful relief that works with your recovery plan, MEDISTIK has your back. Our topical analgesics are clinically proven and designed to help you tackle discomfort so you can get back to moving confidently.
See which of our solutions is right for you at MEDISTIK.


